Sunday, March 25, 2012

Progress

Making progress on my "Letter Loved" Journal. 


For those of you not following, this is an online course I have been taking with Joanne Sharpe. The final assignment is to create a journal using various techniques we learned in our class. I am using a collection of my favorite quotes as the theme. 
To create emphasis on the key words of the quote, I am cutting the word out of contrasting painted papers. In addition, I am also using a black copic brush pen for the cast shadow, as well as a bic correction pen for the highlights. 
The rest of the quote is written directly on the painted paper with a black pitt pen and highlighted with a white gel roller pen. 
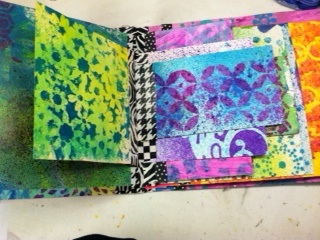
2 page spread as you open the journal


"your imagination is your preview of life's coming attractions"-Albert Einstein
"Live with Passion"- Tony Robbins
          
              "Be the change you wish to see in the World"- Ghandi

The text box for "change" was cut out of a separate painted paper, lettered on, then glued onto background page. The rectangle was then outlined with black to create further emphasis for the word. All other words were written directly onto the painted page. 
...so far....so good.


Saturday, March 24, 2012

Letter Loved pages


Enjoy the close up pictures of my "Letter Loved Journal" pages.

Letter Loved Journal

Finally.....assembled my Letter Loved Journal!!!!! Major accomplishment! It has been on my To Do List since February! So far....I'm pleased with the cover and pages. Now I just have to fill it with LOVE. More will be added as I progress!  How many more days until "Artful Alphabets" start? Better get a move on! Enjoy the pictures!
A combination of lettering written directly on the cover and some cut out .
"Letter" was written directly on the journal cover using the black Copic brush tip. Red-Violet Copic was used for the shadow around the letters, and a bic correction pen was used for the highlights.
"Loved" was cut out and glued to the cover. Black Copic brush tip was used to outline and add cast shadow. And the bic correction pen was used for highlights.
Not wanting my Name to overshadow, I simply cut out a scrap piece of black cardstock and wrote my name with the sharpie white poster pen.

van Gogh Exhibit

Yesterday,  was a beautiful spring day of 80 degrees....and one would never guess it was still March! That in itself is cool....but to make it even "cooler", a group of Art Teachers in my school district had an amazing opportunity to visit the Philadelphia Museum of Art and view the Vincent van Gogh exhibit! What an incredible day!

Getting a chance to view up close and personal so many great works was just what I needed to jump start my engines! As Art teachers, we sometimes get stuck in a rut of production, discipline issues, grades, parent conferences, Art displays and lesson planning. We sometimes lose the excitement and enthusiasm that sparked our passion for Art in the first place. 

So getting a chance to see the great Masters, amidst an unexpected museum evacuation, was just what we needed. 

Entering  the van Gogh exhibit was like entering a holy place. Truly. The crowd was quiet, entranced and reflective. Though rather crowded as you can imagine...it was still a moving experience. 

Walking into the exhibit to view the "sunflower" collection was a very welcoming tribute to the great works by van Gogh. Trying not to touch the layered textures of his paint was very hard... but the security guards were kind in their warnings to step back! lol Seeing only a "portion" of his vast collection of paintings from his life,truly blows your mind. Here is a man, despite his challenges and obstacles in his life, found a way to create art ever day during his short time on Earth. The pieces he created during his stay in an asylum were incredible and an example of not letting anything get in his way of his passion.  

So I'm thinking, if van Gogh can do it every day despite his challenges: his lack of money, his mental state, his institutionalization, his lack of an ear...I can at least  give 10 or more minutes out of my day (with all of my blessings) to create something too! 

So go create some Art!!! 


Wednesday, March 21, 2012

rappy's banner

New banner for my webpage that I'm building with Elaine Ippolito....and hopefully, whenever I figure out all this blog stuff......perhaps at the top of the blog too. But for now....enjoy.....compliments of my fabulous friend elaine.....follow her on 
www.ippolito-art.com.
SHE ROCKS!!!!!!

Tuesday, March 20, 2012

paint scraping with layered stencils


Happy Tuesday everyone! I may start calling this segment "Technique Tuesdays"..
Today's mini tutorial will be on "paint scraping with layered stencils" that I have mentioned on my flickr postings. Hopefully with added photos it will be easier to understand. 
Step 1: Select 3 colors (works best with "analogous" colors=3colors next to each other on the color wheel- will prevent the "muddiness" created when mixing some colors) of acrylic paint. Squirt them randomly around the paper. 

Step 2: get a piece of some cardboard or an old credit card to use as a scraping tool.
Step 3: Use this cardboard in a back and forth motion over top of the paint...scraping it in all directions. *Don't over work it, colors blend too much and lose the cool effect. 
Step 4: Continue until the entire paper is covered to your liking. 
 (sorry, forgot to take a picture of the warm color scheme I had started above...oops!)
Please NOTE: This is how I did the papers for the "Dream Garden- Eric Carle inspiration" piece. I just cut out the painted papers I made this way!!!! sooooo easy!

If interested in taking it a step further......and make it look even "cooler"- if you can only imagine......
Step 5: Select a stencil and lay on top of the DRIED painted paper. Use a contrasting color and sponge paint with acrylic paint.
 Step 6: Carefully remove the stencil...and WAHLAAA! It looks GREAT!!!!! HOLLA!!!
(ok, so I got a little carried away. I'm just saying....you will love love LOVE this. So give it a whirl! Not that you need another addiction.....but you will seriously find it hard to stop! - See, this is why I'm STILL trying to put my letter loved journal together! lol.....well, that's my story and I'm sticking to it! HAVE FUN!!!!!!!!!!!
 

Sunday, March 18, 2012

The return of the Dining Room Table.

After over a month of being taken over as my "temporary studio space" (while working on "Letter Love").....my dining room table is finally restored to it's normal setting. Enjoying it now because very soon it'll be covered again in all my supplies as I venture onto my next Joanne Sharpe "Artful Alphabet" class! Looking forward to it!


capt. jack

Just kicking back watching the latest installment of Capt. Jack in action...and found myself doodling. Haven't drawn faces in quite some time....."not too bad"...lol. especially since I was drawing WHILE watching. New meaning to multi tasking!
Loooooooooove me some Johnny Depp!


Saturday, March 17, 2012

sprayed papers


The following are close up shots of my "sprayed papers" that will become my "Letter Loved" journal for my online lettering class that I'm taking with Joanne Sharpe. Most pages were completed by spraying liquid watercolor paint (dick blick in a $store travel bottle) thru stencil #1 then dried. Acrylic paint was then sponge painted thru stencil #2 for a layered look. The others were done by first squirting 3 colors of acrylic paint randomly on the page then scraped with an old credit card before drying. Once dried, a stencil was laid on top and acrylic paint was sponge painted thru the stencil for this layered look. Enjoy....this is just too much fun!


WARNING: this is very addicting!!!

Channeling Eric Carle....

 Channeling Eric Carle today. 
Loooooooove his work!!! 
"Dream Garden" by Linda K. Rapchak


 So I'm still working on my assignments for my Letter Love online class. This lesson was to use my sprayed/painted paper in strips for my text. Since I had all of this fabulous painted papers my students had done as practice (but only 4x4 1/2 in size), I wanted to use them. I cut them to be the same size (3x4 1/2) then mounted them on black cardstock. Using a black brush pitt pen I wrote a word in each box. I then used a white sharpie paint pen (fine) to add highlights and a pattern around the black frames. 


Once the text boxes were done ( I put them off to the side to dry) I had to decide on a color for the background that would make them pop. So I took several shades of blue acrylic paints...squirted them randomly around the page, then scraped them with an old credit card. Once blow dried, I then sprayed some turquoise alcohol ink for a bit more texture. 

 Using a variety of different sized circle punches, I started making all these great circles from other painted papers and placed them randomly around the page. Sadly, the circles were not enough to make the page feel "complete". 

That's when the Eric Carle inspiration hit me like a ton of bricks! The next thing I know....I have all of these wonderful insects crawling across the page!


To tie it all together, I turned some circles into swirls.....


 Then cut various sized leaves from painted green paper, and added veins to the leaves with a dark green metallic gel roller pen and white sharpie. Placing the leaves around the edge of the paper frames the page nicely. 
Thanks so much for stopping by. Now go and grown your own "Dream Garden".